Fundaments Of Microsoft Azure
Since this is basically an introduction to how to work in azure cloud, we will just move out with some research papers because lot of times when we think in terms of what can go wrong with predictions and everything it's all same old thing like when we press some electronic signal or a button in keyboard what it does is it do? It just goes ahead and it has its own ascii key and variations. But now we are talking about all the scale deployment and scale leveraging of all these kinds of technology.
So, let’s just go ahead and get inside the portal and start learning Microsoft Azure Portal

(Azure Portal)
How To Setup Azure Subscription:
1. If you are a new user just sign up by going into the signup page and fill in all the required details. If you are an existing user, you can simply login to the azure portal.
2. They are four ways to get azure subscription:
Pay as go model: In this Mode you just need to put a credit card where it charges 1500/- INR extra from what you have used. So basically, this model is something like your entire repository of azure services but at the end of the day you will be supported by the azure team as well. You Can click on this Link for a pay as go model account.

Free Account model: so, for a free account it requires a credit card and in return it gives all the popular services free for 12 months and 40+ azure services as always (for example azure functions, cosmos db. etc.). You can click on this Link for a free account.
Free Azure Account for Students model: if you are a student studying in any of the recognized universities you can go for this mode and there is no credit card required, you get 100$ for free and free services from azure. you can click on this Link for free azure account for students.

GitHub Student Pack: So, students can check out the subscription here as soon as you have a University Id card you can access all the paid services for free. click on this Link to access a free azure account through GitHub.

So, Let's Get Started with Microsoft Azure Concepts:
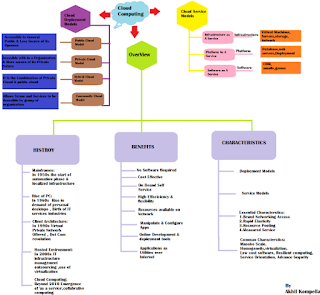
History: So, in the beginning of the azure, they started by having their physical servers in-house they were maintaining it, network operations were done in-house everything was like a mess.so they were confused should we upgrade this hardware or should we upgrade the other hardware. You know life is still there in the dilemma just like they were ready to throw away money but they need state of art Technology and that's where cloud computing came into the picture.
Scalability: So basically, the word scalability is treated as you get Hundreds and Hundreds of hits on your server and it should scale up at one given point of time it should not be like okay, I am just going to break at this point of time Sorry I’m shutting down it should never be that. You should be able to get that many hits at a time and come up with that much amount of traffic, that many people transacting their entire data in and out that system or website should happen like this. So lately we have come with all these evolutions and that's where we came up with Ideas of virtual Machines, containers, serverless and so on.
Setup A Virtual Machine:
How Virtual Machine Starts: So, this is the state of the art beginning that I can say so there is a different set of present configurations. So as soon as you click on the create option there are two options available to your Virtual machine and start with a present configuration

Create a Virtual Machine: So, when you click on the Create Virtual Machine and see how you can access the files. there it still runs the same like Linux or Ubuntu VM’s. So, you can give the name in the Virtual machine named Column so that a group gets created automatically.

So, when you click on Azure Spot Instances to see the magic of prices it shows you two options so you need to plan to your capacity. Capacity meaning what if my VM’s is hit by hundreds of people at one given point of time and my VM is not able to target it. let's not keep it pricier let’s just optimize for the capacity out there or else there is other option saying that if you have set some location of price and you are saying that hey, I can’t pay you that much price then you azure will just start stopping it.

Review & Create: so, when you click on the review this will direct you to a page where it shows you pricing of your virtual machine

")
- So, when you click on the create button it shows a private key and that private key will be downloaded into your Desktop or PC.

- And Meanwhile the Virtual Machine will get simultaneously deployed.

(So, with This Your Virtual Machine is Created)
- Now let us Connect with Virtual Machine for that You need to log into it using RDP that is Remote Desktop Protocol for that you need to click on the one of the virtual machines shown in the list .so we want to be able to connect using RDP so let's click on that

- So, when You click on the RDP file and click on the download button it's going to connect with the virtual machine in azure and going to show error like this
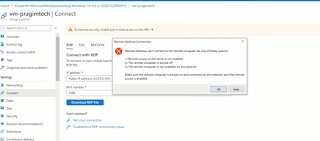
So let us see How can we Solve the Error in RDP File
You might not have configured an inbound rule for RDP connection. This is one of the main reasons why you are not able to connect to your VM using RDP.
In the Azure portal, on your virtual machine blade (Settings - Connect - RDP tab) you will see the port that is being used for RDP connection.
In this example, port 3389 is being used for RDP. This port must be opened on your virtual machine for inbound connection. If it's not, you will see the following generic RDP connection failed error. On your VM open port 3389 for RDP connection. You do this on the Networking tab. Click the "Add inbound port rule" button.


- Click on the Add Inbound port rule and add your port address in destination port ranged column


Comments
Post a Comment